How to use Mailgun with MyMail the newsletter plugin?
Like most of you I use MailChimp to publish newsletters and for the management of my mailing list. If the number of subscribers becomes bigger it’s often better (cheaper) to use a WordPress plugin like MyMail together with a transactional email service provider. In the past, MyMail and Mandrill has been an inexpensive combination, but since Mandrill has become a premium add-on for MailChimp, many MyMail users (including me) are looking for alternatives.

Selecting a new transactional email service for MyMail
Currently you can choose from the add-on section the following SMTP providers for your MyMail application: Mandrill, Amazon SES and Sendgrid. According the product support there should be an option for Mailgun too, but it’s not done until now. There is also a Mailgun add-on for MyMail on Github, but this doesn’t work with current version of MyMail.
How to install Mailgun for MyMail?
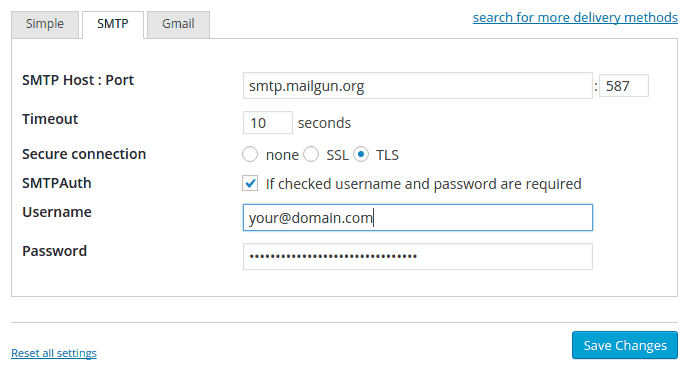
First of all you need a Mailgun account. Register one (it’s free for the first 10.000 mails/month) and add your sending domain name to that account. The whole process is well documented in your Mailgun account, so I don’t repeat it here. If you’re ready, you will find the SMTP server information including your credentials on the domain settings page. Use this information for the MyMail settings: Dashboard > Newsletter > Settings > Delivery. Choose the tab “SMTP” and enter “smtp.mailgun.org” on port “587” and enter also your SMTP credentials. After saving this settings your screen should look like this:

Above the form named “Delivery Method” is an option to test your SMTP connection.
How about mail bounces?
Handling mail bounces is important because every time you send an email that can’t be delivered, that message is counted for account and a high bounce ratio is bad for your Mailgun account authority. It’s like sending the mail delivery guy to a non existing address over and over again. You can find a list of bounces in your Suppressions list.

With the Mandrill add-on it wasn’t necessary to configure the MyMail plugin for mail bounces, because all bounces are reported back to MyMail via Mandrill. Since we use SMTP as the delivery method now, mail bounces need some configuration. You can do this with the mail bounce feature from MyMail (tab “Bouncing”). For this function it’s necessary to forward all bounces to a mailbox where MyMail will “read” these message for further processing. In my personal opinion is this not the best way to handle bounces. Mailgun will collect all bounced email addresses and we need only a simple way to tell MyMail that these addresses need to get off the active subscriber list.
A simple script to process the bounces also in MyMail
The following simple script is maybe a quick and dirty method to handle the mail bounces, but you can use it until the Mailgun add-on for MyMail is released (I’ve read in the comments that the developer has this for more than 1 year on his list!).
The script has two functions: 1) Get the list of all (max. 100 at a time) bounced email address where your need to update the status the from your MyMail subscribers list. 2) Remove the bounced email address from the Mailgun Suppressions list right after the subscriber is updated in MyMail. The last function is necessary, because otherwise the list will become bigger an bigger.
<?php
define('WP_USE_THEMES', false);
// You can check this path for your site while using phpinfo()
require_once '/home/user/username/sites/sitename/public/wp-load.php';

$apikey = 'key-XXXXXXXXXXX';
$domain = 'domain.com';
$mymail_table = 'wp123_mymail_subscribers'; // change your WP table prefix

$args = array(
	'headers' => array(
		'Authorization' => 'Basic ' . base64_encode( 'api:'.$apikey )
	)
);
$args2 = array( 'method' => 'DELETE' );
$merged = array_merge($args, $args2);

if ($response = wp_remote_get( 'https://api.mailgun.net/v3/'.$domain.'/bounces', $args)) {
	$api_response = json_decode( wp_remote_retrieve_body( $response ), true );
	if (is_array($api_response)) {
		foreach ($api_response['items'] as $item) {
			if ( is_email( $item['address'] )) {
				$result = $wpdb->update(
					$mymail_table,
					array( 'status' => '3' ), // status 3 = hardbounced
					array( 'email' => $item['address'] ),
					array( '%d' ),
					array( '%s' )
				);
				if ($result) {
					$url = 'https://api.mailgun.net/v3/'.$domain.'/bounces/'.$item['address'];
					$del_response = wp_remote_request( $url, $merged );
				}
			}
		}
	}
}
Place this script on your website and protect the directory with a password. Change the path for the wp-load.php script and the values for the variables $apikey, $domain and $mymail_table. You can find your API key on the Mailgun settings page. The value for the variable $mymail_table is a combination of your WordPress table prefix plus “mymail_subscribers”. If you prefix is “wp123_” the table name would be “wp123_mymail_subscribers”. You can run the script in your browser (every time before you like to issue a new newsletter) or you can run a daily CRON job. The script is using functions from the WordPress HTTP API and the (new) Mailgun Surpression API.
Update: It’s took a while, but there is a Mailgun integration for the MyMail plugin now. You can install the function via the MyMail extension tab, right from the WordPress dashboard. My first experience was not so great, because after running the first campaign, I got a lot of bounce notices for my MyMail mailing list. I compared both data sets (MyMail and Mailgun) and it was wrong to get all the bounces in MyMail. So after that I restored my old data in MyMail and used the script from this blog post again. It’s possible that this issue is fixed in the meantime. I never tried the extension after that issue again.
Published in: PHP Scripts · WordPress Development
